

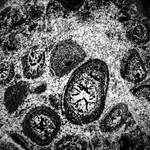
Here’s a close-up shot of a mining operation in the heart of a daisy.
It was taken with a home-made reversing ring and an old 28-80mm Tokina lens. Natural light, manual focus. There’s also some minor focus-stacking on the eyes, to get both of them in focus at the same time.

With a reversing ring adapter attached, the lens can be connected to the camera body backwards. The greatest magnification comes at the shortest focal length of the lens, in this case 28mm. Although the focusing ring also affects magnification (and therefore where the focal plane will be), in operation it’s easier to rely on moving the camera (or the subject) back and forth to find the best focus.

The reversing ring is made from a spare cap that covers the camera body when a lens isn’t attached, combined with a filter step-up adapter ring. The plastic in the centre of the body cap has been cut out (using a drill, and a file to smooth down the edges). Then the step-up ring was super-glued on top. This creates an adapter with a thread to attach to the camera on one side, and a thread matching the lens’s filter size on the other.

The key thing when choosing a step-up ring, is to match the smaller thread size to the thread of the lens. The larger thread size doesn’t matter, as long as it’s wide enough to fit over the body cap. I found that 67mm fit comfortably over the Canon body cap, and chose a 58mm size to step up from, to match the 58mm thread on the lens.

Used in this way, the lens becomes a manual focus, short minimum focal distance (and limited maximum focal distance), high-magnification lens, with extremely narrow depth of field.

Normally, the lens will have a wide aperture until the moment of firing the shutter (this helps the camera to focus, and lets enough light in for the photographer to see through the viewfinder when composing a shot). For this particular lens, that means its widest aperture of f3.5, and since its aperture is controlled entirely by the camera, it’s stuck there when detached from the camera body…
To force the lens into a narrower aperture; set the required aperture, then detach the lens while holding down the depth of field preview button on the camera.

A narrower aperture is helpful to eke out a little more depth of field, because this kind of macro photography leads to a very thin band (often sub-millimetre) of your subject being in focus. Bright sunshine, higher ISO values, and additional lighting are then options to compensate for the reduced light getting through the lens (another issue when working at such short distances can be shadows cast by the lens itself).


Be the first to share your thoughts and comment on “The Probe”...